Pages

  • Twitter
  • Facebook
  • Google+
  • RSS Feed
Showing posts with label Nature. Show all posts

Friday, 17 October 2014


Feeding time near the Okunoshima Shrine

Okunoshima, also known as Usagi (rabbit) Shima, is best known for the 300-400 wild bunnies that call the island their home.

Huddle of buns  

What is perhaps less well known is the tragic past of the island as a site for the manufacture of mustard gas during WWII. It was chosen for its remote location and left off maps to keep it a secret. During this dark period, rabbits were brought onto the island to be unfortunate test subjects of the poison gas. Some people think the rabbits now are descendants of those unfortunate bunnies, but there are also other theories. One popular one is that school children left 8 rabbits behind while on tour, and another is that the rabbits were brought onto the island to see if the island was once again fit for human habitation. 

Whatever the case, the bunnies are now here to stay, and we are so much the better for it haha. 


The various buns around the island. If you go during the high heat of day, you'll most likely find the bunnies lounging under trees or hiding under tables/ benches/ bus stops.

If Tokyo and Kyoto are on your destination maps, head to Okunoshima from Kyoto instead of Tokyo. It will take you approx 150 minutes from Kyoto (discounting waiting time) and around twice that time from Tokyo. From Hiroshima to Mihara, it is only 25 minutes (Shinkansen Kodama ). 

The journey from Kyoto will look something like this (I didn't take Shinkansen Nozomi as the JR pass doesn't cover these trains): 
  1. Kyoto to Fukuyama (Shinkansen Hikari, 95 mins)
  2. Fukuyama to Mihara (Shinkansen Kodama, 23 mins)
  3. Mihara to Tadanoumi (JR Kure line, 20 mins)
  4. Tadanoumi to Okunoshima (Ferry, 12 mins, 300Y)
From Kyoto to Mihara, my plan went without a hitch (even for disaster prone travellers like me, because the Shinkansen is the smoothest running system and there are English translations). My waiting time at Fukuyama to catch the next leg to Mihara was only 13 minutes. Just a note of caution that the Shinkansen leave strictly on time, and the times you see are departure times rather than when the train pulls into the station, so make sure you are on the train before the set time. If you are fairly spontaneous / don't tend to stick to schedules, the JR pass is a life saver as you don't have to be at stations at set timings, and can sit in non-reserve carriages without having to queue.

If you do want to plan carefully, Hyperdia is a wonderful resource. 

I had orignally gotten a reserved ticket, but had overbudgeted my time, and hopped onto a train a whole hour earlier. This meant I had no reserved seat. When I realised to great sadness that there was no more free window seat, I decided to go into the first available car with window seats. Unfortunately, this turned out to be the smoking car, which was also a green car. JR passes don't let you get on green cars as these are premium carriages with plusher seats. When the train conductor came round and realised this, he gently urged me to go back to my proper seat and even got me a reserved seat. But, it was an aisle seat. So (I know this is terrible), I was like thanks but no thanks and continued in that carriage, moving a few seats away from a man who was continuously smoking. When the conductor came back, instead of being rightly appalled at me, he very kindly found me a window seat in another carriage (I think he was also concerned about me being in the smoking carriage, rather than me simply being in a green car). He also very gamely posed for a photograph after I thanked him profusely (and with more than a tinge of shame).

Upon reaching Mihara, I realised my mistake. Having come from Tokyo, I was lulled into a false sense of security that the JR trains practically come every 5 minutes or less. I was also spoilt by the Shinkansen from Tokyo to Kyoto which runs at least once every half hour. This is most certainly not the case at Mihara. The JR Kure line from Mihara to Tadanoumi run only once every hour. Don't make the same mistake as me and please check the timetable for the the JR Kure line. 

I realised I had around 40 mins to kill (40 mins which I could have spent on sleep in Kyoto), so I went to the well placed Mihara tourist office (right at the train station, like all good Japanese tourist offices). I was so happy when I read the brochure that there was an attraction right beside the train station: the Ruins of Mihara Castle.  

Attractions in Mihara. The ruins of the castle are at number 18.

In truth, the name glamourises it somewhat. It is a low fortress surrounded by a small moat and on top of the fortress is little plateau which is now a part and you can walk around in 5 mins or less. Now, I'm not saying Mihara doesn't have other attractions, but it is just that you can't reach these in the waiting time for a train. Still, I'm pretty positive so I enjoyed my waiting time by seeing the small park and eating some local food.

Following this, I went back to the platform. But, to my surprise this train was not punctual like all other Japanese trains. When it was 10 mins late I began to panic and went to ask the JR office. It was only then that they told me: the train from Mihara to Tadanoumi is only two carriages long. This means that it only occupies the very front of the platform. I was standing on the other end of the platform, so I missed it. This would entail another hour's wait. 

Fairly desperate by then, I decided to take a taxi. If, like me you want to consider this, please note that a taxi will set you back around SGD$60, which is fairly steep if you consider that the JR pass would have gotten you there for free. The reason is that the path to Tadanoumi is a winding one along small streets (I got caught behind a lorry, too bad for me). I consoled myself that it was a scenic road as it wound by the sea, and the Seto Inland Sea is really beautiful. Then my positivity kind of ran out when I saw the train tracks winding by the sea too, on the outside of the road. Ah well, I think the exchange of money for time can sometimes be very worth it, especially when you are short of time. 

 Tadanoumi is a sleepy, picturesque, sea side town with plenty of fisheries.

The taxi dropped me off at the train station, and from the train station to the ferry terminal it is a 5 minute walk at a fairly brisk pace.
These directions are pasted on the window across from the train conductor's office at Tadanoumi.
When I got to the ferry terminal I saw a ferry, was delighted, and ran on. Apparently you are supposed to buy a ticket at the terminal, but the people are so nice they accept cash at the door.  

This is the ferry schedule. The first column is the departure time from Okunoshima (大久野島). 
In Japan, try to save the Japanese names of the places/ restaurants you wish to go to, as some places do not have English translations.

This is the schedule for trains departing from Tadanoumi. Again, check out Hyperdia for more info.

Another thing you are supposed to buy at the ferry terminal, which I did not realise to my great detriment, is rabbit food. It was only when I got to the island and enquired with the shop at the resort that I was told: no rabbit food is sold on Okunoshima itself. This was really bewildering as I'd read some guides which said it does. So I was empty handed. Buy your rabbit food before getting on the island to be safe. They like pellets, but they also will eat lettuce (two heads of lettuce should sustain you) and carrots. 

While it doesn't sell rabbit food, the shop sells plenty of rabbit trinkets.


Without rabbit food, I managed to charm (trick) some rabbits to come near to me, but without food, they're not really interested. The bunnies are really quite friendly and will bound up to humans (food sources) but I realised that they don't like to be petted. Very unlike my bun at home who lives to be petted on the head. I guess it's because they are still wild animals. They will, however, interact with you for food. 

Therefore, I needed to get food. In a sad state, I went around begging for food, and the first people I encountered told me that they didn't have enough food for themselves so they refused to sell me any. Disheartened, I went on a hike up to the lighthouse on the south of the island. 

So, the ferry will drop you off at the second pier, and if you want to get to the first pier, there is this bus on the island (timed to coincide with ferry drop offs) that will bring people to the resort/golf course. To circumnavigate the island on foot (4.3 km) will take, according to the tourist map, 1.5 hours at a slow clip. I didn't do the walk around as I was pretty tired by that time (my daily routine involved getting up at 6-8am and walking all day only to get back home at 11-12pm).  


Map of Okunoshima: the 1st ferry pier, the resort, lighthouse and the poison gas museum are all to the south of the island


The hike I took was close to the resort, and went down to the beach (which I understand is a popular camp site in the summer). If you want to go to the poison gas museum (highly recommended), then you may wish to take the bus to the resort, though in truth, between ferry piers it is an easy 20 mins walk. 

The hike to the lighthouse was beautiful and afforded stunning views of the Seto Inland sea.


More importantly for me, on the way I happened to meet a very nice Japanese couple who gave me some rabbit food and refused to take payment. Armed with the food, I could then become a rabbit magnet. So I happily exited the hiking trail (there were not many buns on the trail, I think they are quite deterred by the steps that led up). 

Simply waving the food around will attract a large crowd of hungry buns, who will stand up on their hind legs for food (so cute!) and climb into your lap, or up tables and chairs just to get at the food you are offering.   

These buns heard the rustling of the food and hurried on over


One of the happiest moments of my day was when I spotted a baby bunny in the undergrowth. It was SO CUTE and had a little white fur diamond on its forehead:


And then, I spotted the baby bun's sibling! At first, it was all shy in its burrow. I crept in slowly (you can't tell from the pictures, but I was literally scrambling on my hands and knees in the undergrowth, my legs on the sand and my hair caught in the branches), hoping to gain its trust. And it worked! The little one hopped out, sniffed my food (I think it is too young for adult rabbit food) and chinned my hand! Chinning, for those unfamiliar with rabbits, is a way the rabbit marks its territory (with a scent gland under its chin), and if a rabbit chins you, it is claiming you as its own, so consider it a sign of affection!


Bunnies have the cutest butts!

Apart from the buns, which are the island's main draw, I would say that the Poison gas museum is very worth a visit, even though not every exhibit has an English translation. The entrance fee for adults is 100Y. In true Japanese fashion, you buy tickets at a vending machine, and they trust that visitors will purchase the tickets before entering (there is no one manning the counter to make sure people buy the tickets). Photography is not allowed in the museum.


Outside the museum though, photography is okay (I would think).
This is the vending machine right outside haha

I had some rather mixed feelings in the museum. On the one hand, all our history lessons involved some discussion of the Japanese occupation in Singapore, and how it was a terrible time for our people, so to some extent seeing the equipment used in the manufacture of the gas actually made me quite angry. This was especially so when I read things like how some of the employees reacted when they heard that Japan had lost the war, and I quote "Some said the Japanese army should have made better use of the poison gas". On the other hand, the museum clearly denounced the use of poison gas as a weapon, and appealed for peace, which I was quite touched by. Just outside the museum, there are a number of artworks donated by schoolchildren making the same appeal, and there are also the beautiful Japanese  origami cranes which symbolise the desire for peace.


-----

To sum up my top tips for tourists: 
  •  Trains in Japan are super punctual, and the timings on your ticket are departure rather than arrival times, so be there early! Particularly if you are taking a non-reserved seat, you may need to queue to be assured of a seat. 
  • To get from Kyoto to Okunoshima: (i) take the Shinkansen from Kyoto to Mihara, (ii) the JR Kure line from Mihara to Tadanoumi, and the ferry from Tadanoumi to Okunoshima.
    • The entire trip (without waiting time) will take you approx 150 minutes.  Be on the safe side and budget for more time.
    • The ferry costs 300Y, the rest of the journey will be covered by the JR pass. 
  • The JR Kure line from Mihara to Okunoshima runs only once an hour, so it is a good idea to check the train timing beforehand.
    • The train is only two carriages long, so stand at the start of the platform. 
  • Buy rabbit food before arriving on the island, as rabbit food is not sold on the island. 
  • The poison gas museum on the island is also worth a visit, It costs 100Y and will take you around 20 minutes to cover. 
  • Be kind to the bunnies and have a great time!  

Monday, 28 April 2014

To celebrate Earth Day, the wonderful NParks and Sungei Buloh organised a morning’s worth of fun activities, designed to allow visitors to appreciate the beauty of the mangrove forest, and understand its role in the natural heritage of Singapore.

A weaver bird arranges the twigs that form its home

The first guided tour was to set off at 0930, which was far too early for my friends and I.  As with most of our peers, we love Saturdays with late starts, as a panacea to all those early days we have during the week.  Thankfully, the kind people at Sungei Buloh pre-empted this and had later tours, at 1100 and 1300 respectively.  The 1100 tour was more of our kind of timing, though I was a little sad at the thought that we’d miss the plant-a-propagule segment.


Wait, plant-a-what?  A propagule is a propagated mangrove sapling.  To the unscientific eye, they look very much like long beans haha.  These saplings fall to the mudflat, to allow the tree to propagate itself.  The waves might then carry it away so the new plant doesn’t crowd out its parent.  In Sungei Buloh, to ensure an even spread of plants, park rangers collect fallen propagules, allow them to grow stronger in a nursery and only then replant them in the mangrove in selected spots.
As luck would have it, when we arrived, there were still propagules!  All we had to do was to fill up some little bags with earth and pop a propagule in them, for them to be sent to the nursery.  Volunteers are also welcome for the eventual transplanting to the mudflats, which will give you more of the “real deal” feeling of planting, though this may be for the gutsier types, as our guide told us that you will need a sturdy pair of boots for this.  The mud flats are squishy and will swallow up boots which are not tightly affixed to your foot (of course you can still use your hands to dig the boot out).  
After the planting, we were ready to go on the guided tour, starting at the boardwalk.  My friends and I suffer from this peculiar “check-listing” disease.  Symptoms include: irrational devising of checklists in all situations; anxiety/ feelings of being kan cheong when an item cannot be checked-off; and charging ahead when an item appears.  Our checklist for the day was: crocodiles, horseshoe crabs, smooth otters, and snakes.  How could we think we could compel nature to produce these for our viewing pleasure? (See “irrational”, above.)
The first thing we saw, when our eyes adjusted to the green, was mosquitoes.  Swarms of mosquitoes.  Top tip: bring repellent. Lots of repellent.  Or, you can bring a friend who can be the sacrificial lamb for the group by being the only person who gets bitten (there is usually one person in every group, and v sadly, when I am around, this person is me).  I wore neutral-coloured clothes, sprayed repellent liberally, and wore a mosquito patch, but nothing worked.  Despite the pests, it was still fun and I’d definitely go again, which I think is a pretty good testimony haha.  
Back to the tour.  My aural memory (is this even a term?) is pretty good, so I can remember maybe a good 80% of the guided tour, but I don’t want to give too many spoilers here, so I will only write down what I considered personally to be highlights.
Sungei Buloh, when translated literally from Malay into English, is River (Sungei) Bamboo (Buloh).  Bamboo, however, are not native to Singapore.  Nonetheless, as you walk along the boardwalk, you’ll see two groups of bamboo, one at the start and one at the end.  The one at the start is dark in colour, almost black, thin and shaped like a fan.  I initially thought it looked pretty oppressive, till I saw the squirrels playing and jumping from its branches.  Turns out that squirrels love that bamboo.  The one at the end is what we’re more used to seeing, green straight stalks. 
I really liked the sea holly, so named for its resemblance to the holly that we associate with Christmas.  Sea holly has spiky outer leaves, an adaptation designed to prevent its round inner leaves from being eaten.  The plant is really quite pretty, sadly it is listed as ‘vulnerable’ on the Red List of threatened plants in Singapore (for more information on this plant, see this website – their AMAZING blog and is my guide to all nature happenings in Singapore). 


One thing that struck me was how many plants we saw have common names which are derived from land plants e.g. sea hibiscus (so named for the similarity of its flowers), and sea almond (for similarity of the taste of its seeds!).   I guess humans have a tendency to associate the unfamiliar with the familiar, and it’s always a really nice feeling, especially when you’re overseas, to see something new and different which is somehow familiar to something you know from home.  
We saw plenty of little tree-climbing/ vinegar crabs as well.  Tree-climbing, because the crabs use their sharp legs to scale trees when the tide rises, probably to avoid the predators in the water.  Sadly for the crabs, once they are out of the water, they are exposed from the air, and become tasty snacks for the birds.  These crabs were also once tasty dishes popular with humans.  Our guide's grandfather told her that he used to pickle this crab in black sauce with vinegar, and take it with porridge (hence the name vinegar crab).  He might have been Teochew, as this practice was popular with the Teochews, see here for more info.   

The vinegar crab is pictured with edible snails known locally as gong-gong (dog conch).
As a Singaporean, food is never too far from my thoughts.

Another common creature that is relatively easy to spot (when its basking in the sun) is the mudskipper.  As a life-long city dweller, my eyes have become unaccustomed to spotting wildlife, I think I used to be better at this when I was a child!  The little boy who was in our tour group was excellent at spotting wildlife, and at his call, my friends and I would eagerly respond with 'Where? Where?'  Which eventually became 'WHERE??' when we realised how rubbish our eyes were haha.  But with patience and stillness, see the animals you will.  Pictured below is the giant mudskipper, which I used to think was very cute until I saw this.  Looks like my city eyes gave me false impressions.  The giant mudskipper, unlike the yellow-spotted mudskipper, has two black stripes, one down its left and one down its right.  It is also, well, giant, or at least larger than the other type.  On land, the mudskippers look quite chubby-cheeked, as they store water in pouches to allow them to take in the dissolved oxygen.  Fascinatingly, their eyes can roll 360 degrees to access this oxygen! 


One thing that was alarmingly easy to spot was litter.  This was quite disheartening - who litters in a nature reserve?

Not all the litter was as picturesque as this football, there was the usual
plastic bag/ bottle type of litter.

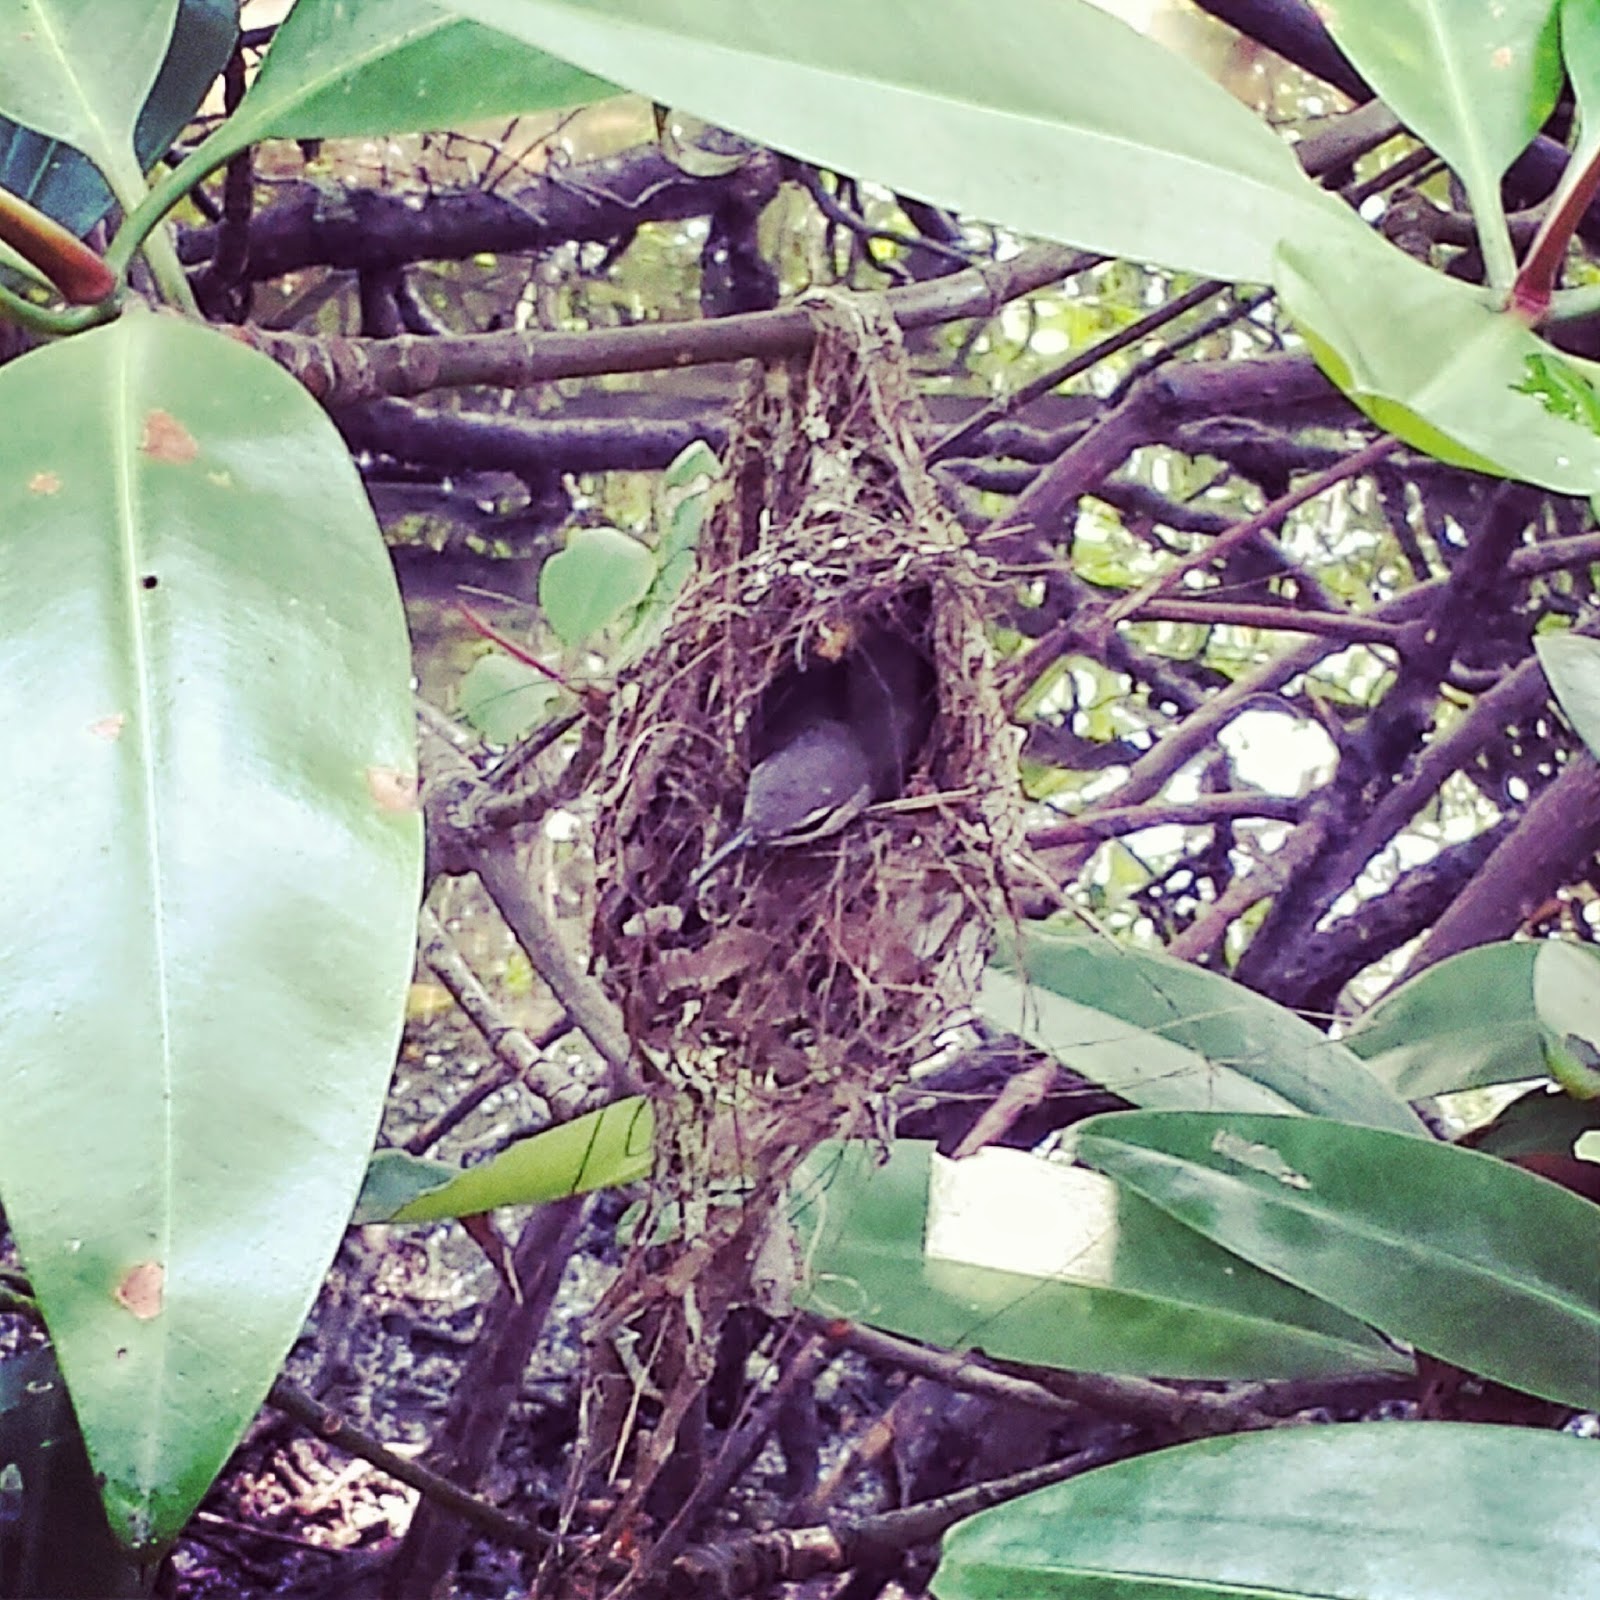
A difficult spot (not by me, obvs) was a weaver bird's nest.  This is the great benefit of going in a group: more eyes, all the better to see nature with!  This nest was under a tree, and we initially thought it was uninhabited.  Nature however, requires some patience, and after a while, the little weaver bird flew home!  It carried some twigs in its beak, and proceeded to spruce up its nest, before cosying in till its next flight out.

Busy at work.

Taking a short breather to cosy up in its nest. In less than a minute, it was off again!


I was pretty amazed by another tour guide who spotted a snake.  In the picture below, the red of the snake can be seen, but the tree was a slight distance away from the boardwalk, so I think she must have super eyes.  This little snake is the paradise tree snake, a gifted glider which can propel itself off trees to spring surprise attacks on its prey.  Although as thin as a whip here, it can grow up to 1 metre long, and when it does, it can go after squirrels. 


This incredible NatGeo clip, filmed in Singapore, shows the snake in flight. http://www.youtube.com/watch?v=6OVMebCUubs 


Monday, 21 April 2014

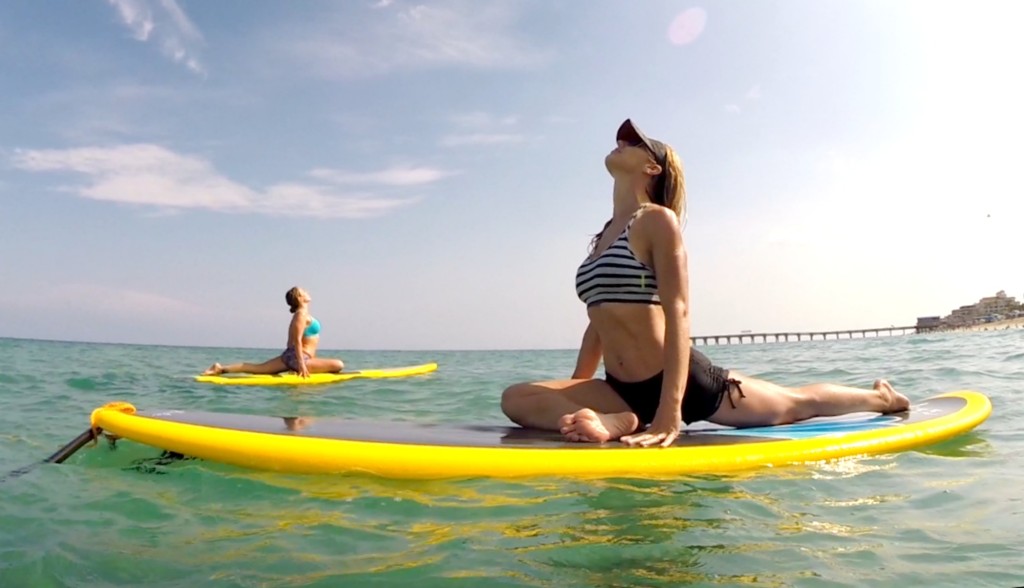
Most of the photos in this post are from an album on the SUP Yoga Singapore facebook page! Thanks very much SUP Yoga Singapore! 


From SUP's facebook page

Have you heard of Stand Up Paddleboarding, or SUP for short?  I first heard of this last year or the year before last and was fairly intrigued. On the one hand, it's a water sport and I like water sports. On the other hand, I couldn't quite figure out what it's selling point was: want to paddle? Get a kayak. Want to balance on a board? Go surfing. I kind of saw SUP as the lovechild of kayaking and surfing and thought it couldn't be all that hard? In a show of great over confidence,  my friends and I decided to skip a SUP lesson and go straight for SUP yoga! We all love yoga (and do it around thrice a week) and SUP yoga would be just another way of doing yoga right?  Plus we'd all seen @stoked_yogi on instagram and she makes everything look so effortless, maybe we'd be effortless too? Ehhhh, not quite. Hahaha. Turns out that SUP requires a lot of core, and I can't quite do a sit-up properly, so go figure! 

The incredible Stoked Yogi

It didn't help that we were all pretty nervous before the class haha. As prep,we watched videos such as this, on how to get back on your board and the realisation hit: might not be so easy to stand after all. And, horrors, we wouldn't just be standing,  we'd be doing an array of yoga poses! Also, I hadn't realised that we'd be anchored, so I had visions of myself drifting away and paddling ferociously back to the group every few minutes. My arms were tried just thinking about this. Thankfully, SUP Yoga Singapore anticipated this, and we were anchored.

From SUP's facebook page

So we headed to East Coast and surprisingly for us, arrived early. So we amused ourselves looking at the SUP-pers (hehe SUP lends itself to great puns. Like if I ever had a SUP school I'd call it YO WASSUP, with the yo standing for yoga). By amused I mean our legs quaked with fear as theirs quaked with effort. We cheered on those doing well and grimmaced when another one bit the waves. It was reassuring though, to see people do long successful runs of paddling. 

The SUP-pers at sea

So, when our turn came, our friendly instructor Nicole (who took all these wonderful pics!) gave a quick orientation: 

1. Type of boards offered: 2 types of boards, inflatable and fibreglass. If you have a premonition that your face and board may often collide, pick the inflatable. I have firsthand faceplanting experience on an inflatable board and can tell you that while it still hurts (obvs) it is not too bad. Sadly I have not had the opportunity to smash my face into a fibreglass so I can't quite compare but I think it's a fair assumption that it'll hurt more.

Anatomy of a SUP Board. Original from SUP's facebook page, edits by me. 

The inflatable paddleboards are pictured above. With some help from a nice man who was helping out at SUP, I attached my GoPro (in wrist housing) to the black strings near the nose of the Board. If you have a dry bag, you can secure it to the black lines, but chances are you won't be needing anything for the one hour at sea. 

How to fling the anchor out: space yourselves so you don't fling it onto a friend. Throw away frm the shore, towards the horizon. Try to put some muscle into the throw as otherwise,  you'll move a rope's length away from your carefully selected spot.

Trying not to look too anxious before hopping on

Paddling out: kneeling or on belly with hands (we did not have use of a paddle). If you are little, scooch more towards the ends to give yourself more room to paddle.

Row, row, row your board

If you are fairly tall, you may find the "sticky portion" a little too short for your yoga needs, but I had no problems and didn't have to adjust myself at all. Also, if you are small, your centre of gravity is lower! Yay for perks of being short! We were blessed with great weather - only gentle breezes and calm waves - so Nicole let us try the baby bakasana (crow) pose, with the option to move into a full bakasana. Full bakasana was when my face got to know the board well. Minor ow, nothing too major. 

Something to crow about (okay I'll stop with the bad puns)
From SUP's facebook page

To my surprise, the hardest pose for me (apart from the arm balances) was the humble mountain pose. It was initially a challenge to stand on the board (see lack of core mentioned above) and I fell into the water a couple times. 

The lens has gone spotty here from the water, but I'm still smiling, all is good.

The good thing is, after your first fall into the water, it is no longer scary. The downside is that in downward dog, you can welcome a nose-full of sea water. Nothing I can't handle. 

Modified warriors and mountain pose on the top left
From SUP's facebook page

The back bends were fun! Basically, anything that involves a lowered centre of gravity was fun times in my book. 

Wheels at sea - from SUP's facebook page

Being at sea practically calls out for the mermaid pose. Top tip: for this pose and the three-legged dog, really square your hips, this will prevent you from putting too much weight on either side which will then rock the board.  

From SUP's facebook page

To my surprise, there was one pose that was easier on the SUP than on land. This was the split. I was surprised that I could lower into a full side split (the front still eludes me!) and do a forward fold - that's me in the turquoise rash guard below. I think it was the desperation to be as close to the board as possible. 

From SUP's facebook page

What I really liked about SUP Yoga is the savasana pose. Drifting at sea is super relaxing. 

Om (while thinking of the om nom noms later)

So, would I recommend SUP Yoga? YES! It is great for a try. Challenge yourself and all that. Make sure you've got a decent core (I define decent by ability to hold a plank for more than a minute). 

Would I go back? Yes, but not so soon. I find SUP Yoga not so good for building ability to do poses, which is what I want to focus on right now. But it's got a great fun factor, and I've thought of new poses to test out (side plank, anyone?) on the SUP. So I'll be back! 

---
Summary of top tips:
  • Come prepared. I suggest a rash guard for more grippage if you want to do arm balances. 
  • Come ready to take a tumble in the water - it's really okay! 
  • You should have a basic yoga practice, or at least know the names of the basic poses
  • Find out more about SUP Yoga Singapore here, or here
  • Cost: $50 for a single session ($30 for a deposit on Paypal, $20 to be paid after class)
  • When: A sunset session every Sunday at 5:30 - 6:30 pm
  • Where: Meet at the beach opposite the bus stop at F3 car park at East Coast Park
  • Washing -up facilities at the Water Venture which is around 50m away (bring towels, toiletries and a change of clothes)
  • Make a reservation here
  • Have fun! 
A happy customer after the class!

Sunday, 30 March 2014

This is the first post in a series detailing our March 2014 trip to Oslob, Cebu City and Boracay in the Philippines.

We headed to Oslob with hopes to see whale sharks. These gentle giants are filter feeders and can grow up to 12m (some say 14m!). Basically, we were super excited about the idea of swimming with creatures the sizes of buses. Their mouths are so wide they can fit a human being in sideways, but of course they don't eat humans so there is no risk of that. 

Oslob, a sleepy fishing village in Cebu, has been put on the map of adventure-seekers for the chance to swim with the whale sharks that congregate a very short distance away from the shore. The whale sharks gather every morning when the fishermen row out to feed them small shrimps. This feeding has stirred up its fair share of controversy (see this for some discussion of the controversy). As an alternative to Oslob, whale sharks can also be seen at Donsol but unlike Oslob, there is no guarantee of seeing the whale sharks there. We considered Donsol too, but felt that we would be heartbroken if we missed seeing the whale sharks and thus headed to Oslob. 

If you have considered all this and come to a decision to go to Oslob, then read on! This post is for you.

As for how to get to Oslob, the air-conditioned bus is strongly recommended! We took the non air-conditioned bus on the way there and had rain drops fall on us and had to squeeze (I'm relatively tiny and yet I found it squash!) onto small seats and through narrow aisles. For 5 php (< 20 cents sgd) the comfort of the big tour bus (which has complimentary movies!) is so worth it. Also, if you are alighting a slight distance away from Bgy Tan-awan, you may need to tell the bus driver where you are a couple times, as he missed our stop initially! Thankfully the bus inspector was onboard then and helped us to sort it out so we took the nice bus backwards (I insisted that this leg our journey was to be free) till we got to our homestay. I must say that in general,  Philippinos are pretty accommodating and friendly though there is still something of a language barrier in the more remote villages and a cultural gap in terms of the pace of life. The Singaporean in me kept wanting efficiency and to rush about so I had to tell myself this was no Amazing Race. 

My sis and I read that a homestay was the way to go for travellers on a shoestring budget and ours was a short distance away from Bgy Tan-awan. The hostels at Bgy Tan-awan are much more expensive, but we only found this out the hard way! There was a misunderstanding with the homestay booked on Air B&B (this was slated to cost 2700 php for 3 nights) and so we wound up at Brumini Beds & Beach Resort (which costs 2000 php for one night). This is why if you are on a budget, consider making Oslob a day tour so you don't need to stay the night. 


Brumini Resort is located less than 200m away from the whale shark watching site, and it offers a free shuttle to there. There are also eating places and souvenir shops located within Brumini's which is really convenient! There are adorable whale shark magnets and cute tee shirts to be purchased. 


Even so, not sure I'd recommend Brumini's as the rooms aren't cheap and our bathroom was constantly flooded. Also, you have to rent the cabanas by the beach! 

To see the whale sharks, try to get to the viewing point by 0630 (viewing starts at 0600). Our resort said that we should go at 0700 as there would be more whale sharks then and more light which would make for better photographs. I'm so glad we did not heed that advice, as the crowds started pouring in by the time we were done with our half-hour slot at 0700. If you go at 0630,there will be only 4 - 5 boats around and you will just miss the crowds. In the picture below you can see the crowd starting to gather as our boat leaves. 


When you get to the viewing point, there is a short briefing of less than 5 minutes:


Some of these rules are honoured in the breach e.g. the one that says people have to wear a life jacket at all times. However, some rules really should be observed, e.g. not to touch the whale sharks, as they have a protective layer around them that prevents them from infections and the like and touching them will remove this layer. Also, not to use flash photography. 

This is the little boat that brings people out to sea. 

The unflappable boatman 


Oh and bring along a underwater camera! You can hand these to the very experienced boatmen who will help you take the photographs. We brought along a go pro, which turned out to be an excellent idea as this allowed us to get photos of the full length of the whale sharks. And the high res pictures allow other swimmers to be cropped out while retaining a large enough image. Brilliant! 


I'll never forget my first glimpse of the whale sharks from the boat. Their huge shadows beneath the surface were incredible! 


And then, we launched ourselves off and started snorkelling! Snorkelling was a bit difficult for me as I kept going in too deep and ended up gulping down mouthfuls of seawater. Incidentally, the sea smelt extremely fish, or rather, shrimpy, from the shrimp the fishermen fling into the sea. I must have eaten my fair share of shrimp meant for the whale sharks. 

Also, the well-meaning boatmen will push you into the water the first few times so that you can get better shots with the whale sharks. Advice: get prepared to submerge yourself into the water as gracefully as possible. I ended up looking like a half-drowned sinker most of the time! 


If you're anything like me, after a few rounds of trying to submerge yourself, you'll be gasping for air, and you can hang onto the side of the boat to catch your breath before going in again! 


Each session lasts half an hour and is well enough for you to take photos and simply hang out (you can hang onto the sides of the boat while snorkelling so you don't exhaust yourself) and take in the beauty of the whale sharks. 

-------------
To sum up our top tips for tourists: 

The following steps will get you from Mactan Airport in Cebu to Oslob: 

  • Catch a cab to the South Bus Terminal in Cebu City. This will take 30 mins and cost around 300 php. 
  • From there, take a bus to Oslob. The buses start at 0430, try to get on an early bus to avoid the notorious Cebu traffic. 
  • The bus journey takes 2 - 4 hours and costs 150 php for a non air-conditioned bus and 155 php for an air-conditioned bus. 
  • If you want to see the whale sharks right away, tell the bus driver to drop you off at Bgy Tan-awan. 

For whale shark (butanding) watching in Oslob:

  • The watching schedule is from 0600 to 1230
  • To beat the crowds, plan to arrive before 0700
  • The bonus of going early is that you can take a second slot if you ao fancy
  • Each slot is a half hour block
  • Cost for whale shark watching only: 300 php
  • Cost for whale shark watching and snorkeling (inclusive of equipment) for foreigners: 1,000 php (for locals: 500 php)
 
© 2012. Design by Main-Blogger - Blogger Template and Blogging Stuff