Pages

  • Twitter
  • Facebook
  • Google+
  • RSS Feed
Showing posts with label Go Pro. Show all posts

Monday, 21 April 2014

Most of the photos in this post are from an album on the SUP Yoga Singapore facebook page! Thanks very much SUP Yoga Singapore! 


From SUP's facebook page

Have you heard of Stand Up Paddleboarding, or SUP for short?  I first heard of this last year or the year before last and was fairly intrigued. On the one hand, it's a water sport and I like water sports. On the other hand, I couldn't quite figure out what it's selling point was: want to paddle? Get a kayak. Want to balance on a board? Go surfing. I kind of saw SUP as the lovechild of kayaking and surfing and thought it couldn't be all that hard? In a show of great over confidence,  my friends and I decided to skip a SUP lesson and go straight for SUP yoga! We all love yoga (and do it around thrice a week) and SUP yoga would be just another way of doing yoga right?  Plus we'd all seen @stoked_yogi on instagram and she makes everything look so effortless, maybe we'd be effortless too? Ehhhh, not quite. Hahaha. Turns out that SUP requires a lot of core, and I can't quite do a sit-up properly, so go figure! 
The incredible Stoked Yogi

It didn't help that we were all pretty nervous before the class haha. As prep,we watched videos such as this, on how to get back on your board and the realisation hit: might not be so easy to stand after all. And, horrors, we wouldn't just be standing,  we'd be doing an array of yoga poses! Also, I hadn't realised that we'd be anchored, so I had visions of myself drifting away and paddling ferociously back to the group every few minutes. My arms were tried just thinking about this. Thankfully, SUP Yoga Singapore anticipated this, and we were anchored.

From SUP's facebook page

So we headed to East Coast and surprisingly for us, arrived early. So we amused ourselves looking at the SUP-pers (hehe SUP lends itself to great puns. Like if I ever had a SUP school I'd call it YO WASSUP, with the yo standing for yoga). By amused I mean our legs quaked with fear as theirs quaked with effort. We cheered on those doing well and grimmaced when another one bit the waves. It was reassuring though, to see people do long successful runs of paddling. 

The SUP-pers at sea

So, when our turn came, our friendly instructor Nicole (who took all these wonderful pics!) gave a quick orientation: 

1. Type of boards offered: 2 types of boards, inflatable and fibreglass. If you have a premonition that your face and board may often collide, pick the inflatable. I have firsthand faceplanting experience on an inflatable board and can tell you that while it still hurts (obvs) it is not too bad. Sadly I have not had the opportunity to smash my face into a fibreglass so I can't quite compare but I think it's a fair assumption that it'll hurt more.

Anatomy of a SUP Board. Original from SUP's facebook page, edits by me. 

The inflatable paddleboards are pictured above. With some help from a nice man who was helping out at SUP, I attached my GoPro (in wrist housing) to the black strings near the nose of the Board. If you have a dry bag, you can secure it to the black lines, but chances are you won't be needing anything for the one hour at sea. 

How to fling the anchor out: space yourselves so you don't fling it onto a friend. Throw away frm the shore, towards the horizon. Try to put some muscle into the throw as otherwise,  you'll move a rope's length away from your carefully selected spot.

Trying not to look too anxious before hopping on

Paddling out: kneeling or on belly with hands (we did not have use of a paddle). If you are little, scooch more towards the ends to give yourself more room to paddle.

Row, row, row your board

If you are fairly tall, you may find the "sticky portion" a little too short for your yoga needs, but I had no problems and didn't have to adjust myself at all. Also, if you are small, your centre of gravity is lower! Yay for perks of being short! We were blessed with great weather - only gentle breezes and calm waves - so Nicole let us try the baby bakasana (crow) pose, with the option to move into a full bakasana. Full bakasana was when my face got to know the board well. Minor ow, nothing too major. 

Something to crow about (okay I'll stop with the bad puns)
From SUP's facebook page

To my surprise, the hardest pose for me (apart from the arm balances) was the humble mountain pose. It was initially a challenge to stand on the board (see lack of core mentioned above) and I fell into the water a couple times. 

The lens has gone spotty here from the water, but I'm still smiling, all is good.

The good thing is, after your first fall into the water, it is no longer scary. The downside is that in downward dog, you can welcome a nose-full of sea water. Nothing I can't handle. 

Modified warriors and mountain pose on the top left
From SUP's facebook page

The back bends were fun! Basically, anything that involves a lowered centre of gravity was fun times in my book. 

Wheels at sea - from SUP's facebook page

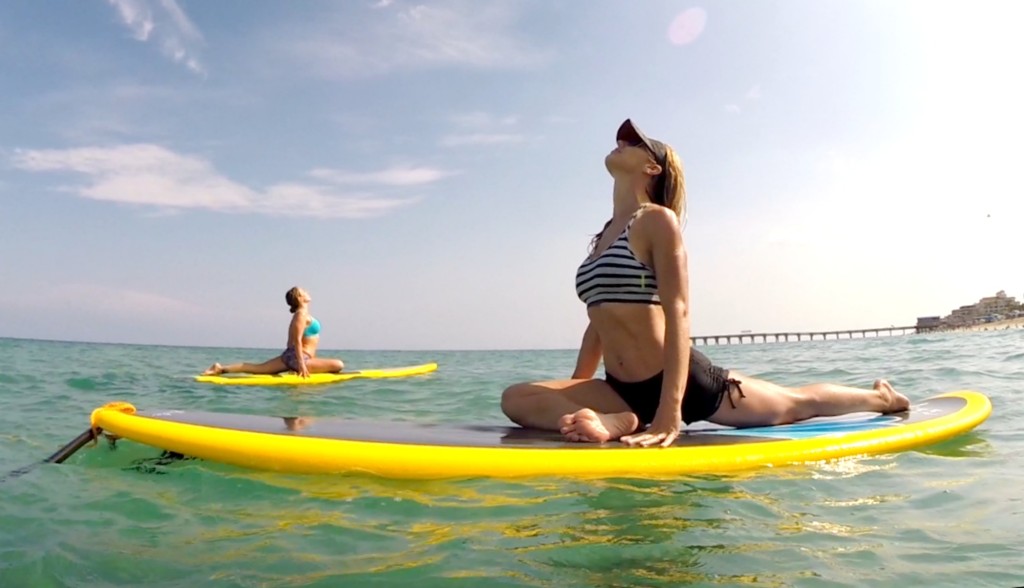
Being at sea practically calls out for the mermaid pose. Top tip: for this pose and the three-legged dog, really square your hips, this will prevent you from putting too much weight on either side which will then rock the board.  

From SUP's facebook page

To my surprise, there was one pose that was easier on the SUP than on land. This was the split. I was surprised that I could lower into a full side split (the front still eludes me!) and do a forward fold - that's me in the turquoise rash guard below. I think it was the desperation to be as close to the board as possible. 

From SUP's facebook page

What I really liked about SUP Yoga is the savasana pose. Drifting at sea is super relaxing. 

Om (while thinking of the om nom noms later)

So, would I recommend SUP Yoga? YES! It is great for a try. Challenge yourself and all that. Make sure you've got a decent core (I define decent by ability to hold a plank for more than a minute). 

Would I go back? Yes, but not so soon. I find SUP Yoga not so good for building ability to do poses, which is what I want to focus on right now. But it's got a great fun factor, and I've thought of new poses to test out (side plank, anyone?) on the SUP. So I'll be back! 

---
Summary of top tips:
  • Come prepared. I suggest a rash guard for more grippage if you want to do arm balances. 
  • Come ready to take a tumble in the water - it's really okay! 
  • You should have a basic yoga practice, or at least know the names of the basic poses
  • Find out more about SUP Yoga Singapore here, or here
  • Cost: $50 for a single session ($30 for a deposit on Paypal, $20 to be paid after class)
  • When: A sunset session every Sunday at 5:30 - 6:30 pm
  • Where: Meet at the beach opposite the bus stop at F3 car park at East Coast Park
  • Washing -up facilities at the Water Venture which is around 50m away (bring towels, toiletries and a change of clothes)
  • Make a reservation here
  • Have fun! 
A happy customer after the class!

Sunday, 6 April 2014

There is a strange exhilaration that comes with putting your life in a controlled kind of danger. Obviously I don't mean freewheeling danger; that is both insane and not very much fun. I'm looking for terrific not terrifying. 

With the good kind of danger comes that great kick of adrenaline to trigger the fight or flight instinct. When you're standing on a ledge leading out to sea, looking at your toes peeking over the board into the gulf of nothing before the inevitable crash into deep water, this fight or flight instinct translates into JUMP or run back off the board.


Then comes the internal fight to steady your pounding heart and to convince yourself to take the leap. The other guys at Ariel's Point told me not to think so much, but I disagree. The thinking, even the wavering, is the best part. It is the struggle before the leap that makes surfacing after a completed jump feel SO AMAZING. Because you did it. Because you did it even though you were afraid. And that is a microcosm of what makes living worthwhile. 


My peace sign here hides the fact that I was rather scared even though I don't usually have a fear of heights. 


And.... LEVITATION. 

So, the sis and I headed to Ariel's Point,  a small island off Boracay with the requisite steep cliffs and deep waters to tempt crazies like us to go.

There are 5,10 and 15 metre boards. All guests are encouraged to test out the lower boards before going for the high one. This lets you get a feel of the water impact (spoiler alert: it kind of hurts if you don't jump right!).  Of course, crazies like us just had to go for the 15 metre board. My upbringing (or perhaps innate personality) tells me: if I can challenge myself I MUST DO IT. 


The most important part of the jump - besides having the guts to actually jump - is how to nail the landing. The best way to land is feet first - the feet are the toughest part of the body. I had all these grand ambitions of doing a karate kick jump or a dive. The latter I executed but ended up doing a partial flip and while I jumped in well (head-first) I must have over balanced as I hit the water squarely on my back and wound up gasping for air and in some degree of shock. Nothing too much to overcome, and when I hauled my sorry self back up, other concerned travellers asked me if I was okay - they heard the loud 'piak' sound as I unglamorously hit the water. So if you want to dive head first, make sure that you get a clean entry, also vertically, but with your hands.Don't let the first point of impact be your precious head!


That falling shape above is me, in what is probably the safest (i.e. least painful) way to jump, though it doesn't make for the prettiest pictures. Wrap your arms around yourself, and spring off, keeping your body vertical so you get a feet first entry. On my first attempt, I didn't sufficiently engage my core and ended up getting a butt-first entry. Very. Very. Painful. And I have the burst capillaries on my poor body to show for it. Not a good idea. 

After each jump, you have to climb up a little ladder, and a series of gentle steps to get back up. And if you're jumping from the 15 metre board, you'll have to do a little swim to get to the steps. Nothing too strenuous if you are an okay swimmer. 


The price is, like the cliffs, pretty steep: 2000 php (60 sgd) per person. But this price tag comes with free flow drinks, which include water, beer and spirits. I'm certain some people in our group made up that cost solely in alcohol! We tried to go easy on the drinks till after getting some jumps in though some people took the drinks for Dutch courage haha. It's best not to drink too much as cliff jumping is inherently dangerous. The briefing in the morning solemnly mentioned that "fatalities" were not covered. Thankfully, none of that happened that day. Not a broken anything in sight either. Bruises, though, another story. 

As a part of the package, snacks in the form of fruits and deep fried sugary sweet potatoes are provided, as well as a fantastic buffet lunch.


Us happily eating the bbq buffet lunch while our new friend reclines in a hammock after the morning's adrenaline rush. 

Following lunch, no one was mad enough to start jumping right away and the Ariel's Point folk know this, so they provide snorkelling gear and kayaks (included in the price). 


We did a couple more jumps each then called it a day. 

Leaving you with a last pic of an awesome jump! This guy still managed a vertical entry into the water after the backflips. 


----

To sum up our top tips for tourists: 
  • Check out the Ariel's Point website
  • Check if your resort can book an Ariel's Point trip for you, ours did. 
  • Total cost per pax: 2000 php. They only accept cash. 
    • If you stay at The Boracay Beach Club, it'll cost you 1700 php
  • Cancellation policy: cancellations before 0900 of the day of your trip will give you a full refund. Otherwise, there will be a levy of 500 php. 
  • The boat to Ariel's Point leaves at 1130 and returns at 1630. The boat ride takes half an hour either way, so that gives you 4 hours of activity time.
  • The Ariel's Point package includes: 
    • Lunch (barbecue buffet) 
    • Snacks (watermelon and deep fried sweet potatoes)
    • Free flow drinks (beer, cocktail mixes and water) from the time you get on the boat, to the time you disembark 
    • Snorkels (no fins) 
    • Kayaks (both single and double kayaks) 
    • CLIFF JUMPING (of course!)
  • Tips for jumping: 
    • Start with the lower jumps to build confidence. 
    • Just walk up, take a breath and go! Lingering on the ledge or looking down will cause a loss of confidence. 
    • Go in feet first. The easiest way to do this is the wrap your hands around your body, or to raise your hands straight up. Tighten your core and keep steady. 
    • HAVE FUN!

Sunday, 30 March 2014

This is the first post in a series detailing our March 2014 trip to Oslob, Cebu City and Boracay in the Philippines.

We headed to Oslob with hopes to see whale sharks. These gentle giants are filter feeders and can grow up to 12m (some say 14m!). Basically, we were super excited about the idea of swimming with creatures the sizes of buses. Their mouths are so wide they can fit a human being in sideways, but of course they don't eat humans so there is no risk of that. 

Oslob, a sleepy fishing village in Cebu, has been put on the map of adventure-seekers for the chance to swim with the whale sharks that congregate a very short distance away from the shore. The whale sharks gather every morning when the fishermen row out to feed them small shrimps. This feeding has stirred up its fair share of controversy (see this for some discussion of the controversy). As an alternative to Oslob, whale sharks can also be seen at Donsol but unlike Oslob, there is no guarantee of seeing the whale sharks there. We considered Donsol too, but felt that we would be heartbroken if we missed seeing the whale sharks and thus headed to Oslob. 

If you have considered all this and come to a decision to go to Oslob, then read on! This post is for you.

As for how to get to Oslob, the air-conditioned bus is strongly recommended! We took the non air-conditioned bus on the way there and had rain drops fall on us and had to squeeze (I'm relatively tiny and yet I found it squash!) onto small seats and through narrow aisles. For 5 php (< 20 cents sgd) the comfort of the big tour bus (which has complimentary movies!) is so worth it. Also, if you are alighting a slight distance away from Bgy Tan-awan, you may need to tell the bus driver where you are a couple times, as he missed our stop initially! Thankfully the bus inspector was onboard then and helped us to sort it out so we took the nice bus backwards (I insisted that this leg our journey was to be free) till we got to our homestay. I must say that in general,  Philippinos are pretty accommodating and friendly though there is still something of a language barrier in the more remote villages and a cultural gap in terms of the pace of life. The Singaporean in me kept wanting efficiency and to rush about so I had to tell myself this was no Amazing Race. 

My sis and I read that a homestay was the way to go for travellers on a shoestring budget and ours was a short distance away from Bgy Tan-awan. The hostels at Bgy Tan-awan are much more expensive, but we only found this out the hard way! There was a misunderstanding with the homestay booked on Air B&B (this was slated to cost 2700 php for 3 nights) and so we wound up at Brumini Beds & Beach Resort (which costs 2000 php for one night). This is why if you are on a budget, consider making Oslob a day tour so you don't need to stay the night. 


Brumini Resort is located less than 200m away from the whale shark watching site, and it offers a free shuttle to there. There are also eating places and souvenir shops located within Brumini's which is really convenient! There are adorable whale shark magnets and cute tee shirts to be purchased. 


Even so, not sure I'd recommend Brumini's as the rooms aren't cheap and our bathroom was constantly flooded. Also, you have to rent the cabanas by the beach! 

To see the whale sharks, try to get to the viewing point by 0630 (viewing starts at 0600). Our resort said that we should go at 0700 as there would be more whale sharks then and more light which would make for better photographs. I'm so glad we did not heed that advice, as the crowds started pouring in by the time we were done with our half-hour slot at 0700. If you go at 0630,there will be only 4 - 5 boats around and you will just miss the crowds. In the picture below you can see the crowd starting to gather as our boat leaves. 


When you get to the viewing point, there is a short briefing of less than 5 minutes:


Some of these rules are honoured in the breach e.g. the one that says people have to wear a life jacket at all times. However, some rules really should be observed, e.g. not to touch the whale sharks, as they have a protective layer around them that prevents them from infections and the like and touching them will remove this layer. Also, not to use flash photography. 

This is the little boat that brings people out to sea. 

The unflappable boatman 


Oh and bring along a underwater camera! You can hand these to the very experienced boatmen who will help you take the photographs. We brought along a go pro, which turned out to be an excellent idea as this allowed us to get photos of the full length of the whale sharks. And the high res pictures allow other swimmers to be cropped out while retaining a large enough image. Brilliant! 


I'll never forget my first glimpse of the whale sharks from the boat. Their huge shadows beneath the surface were incredible! 


And then, we launched ourselves off and started snorkelling! Snorkelling was a bit difficult for me as I kept going in too deep and ended up gulping down mouthfuls of seawater. Incidentally, the sea smelt extremely fish, or rather, shrimpy, from the shrimp the fishermen fling into the sea. I must have eaten my fair share of shrimp meant for the whale sharks. 

Also, the well-meaning boatmen will push you into the water the first few times so that you can get better shots with the whale sharks. Advice: get prepared to submerge yourself into the water as gracefully as possible. I ended up looking like a half-drowned sinker most of the time! 


If you're anything like me, after a few rounds of trying to submerge yourself, you'll be gasping for air, and you can hang onto the side of the boat to catch your breath before going in again! 


Each session lasts half an hour and is well enough for you to take photos and simply hang out (you can hang onto the sides of the boat while snorkelling so you don't exhaust yourself) and take in the beauty of the whale sharks. 

-------------
To sum up our top tips for tourists: 

The following steps will get you from Mactan Airport in Cebu to Oslob: 

  • Catch a cab to the South Bus Terminal in Cebu City. This will take 30 mins and cost around 300 php. 
  • From there, take a bus to Oslob. The buses start at 0430, try to get on an early bus to avoid the notorious Cebu traffic. 
  • The bus journey takes 2 - 4 hours and costs 150 php for a non air-conditioned bus and 155 php for an air-conditioned bus. 
  • If you want to see the whale sharks right away, tell the bus driver to drop you off at Bgy Tan-awan. 

For whale shark (butanding) watching in Oslob:

  • The watching schedule is from 0600 to 1230
  • To beat the crowds, plan to arrive before 0700
  • The bonus of going early is that you can take a second slot if you ao fancy
  • Each slot is a half hour block
  • Cost for whale shark watching only: 300 php
  • Cost for whale shark watching and snorkeling (inclusive of equipment) for foreigners: 1,000 php (for locals: 500 php)
 
© 2012. Design by Main-Blogger - Blogger Template and Blogging Stuff