Pages

  • Twitter
  • Facebook
  • Google+
  • RSS Feed

Monday 28 April 2014

To celebrate Earth Day, the wonderful NParks and Sungei Buloh organised a morning’s worth of fun activities, designed to allow visitors to appreciate the beauty of the mangrove forest, and understand its role in the natural heritage of Singapore.

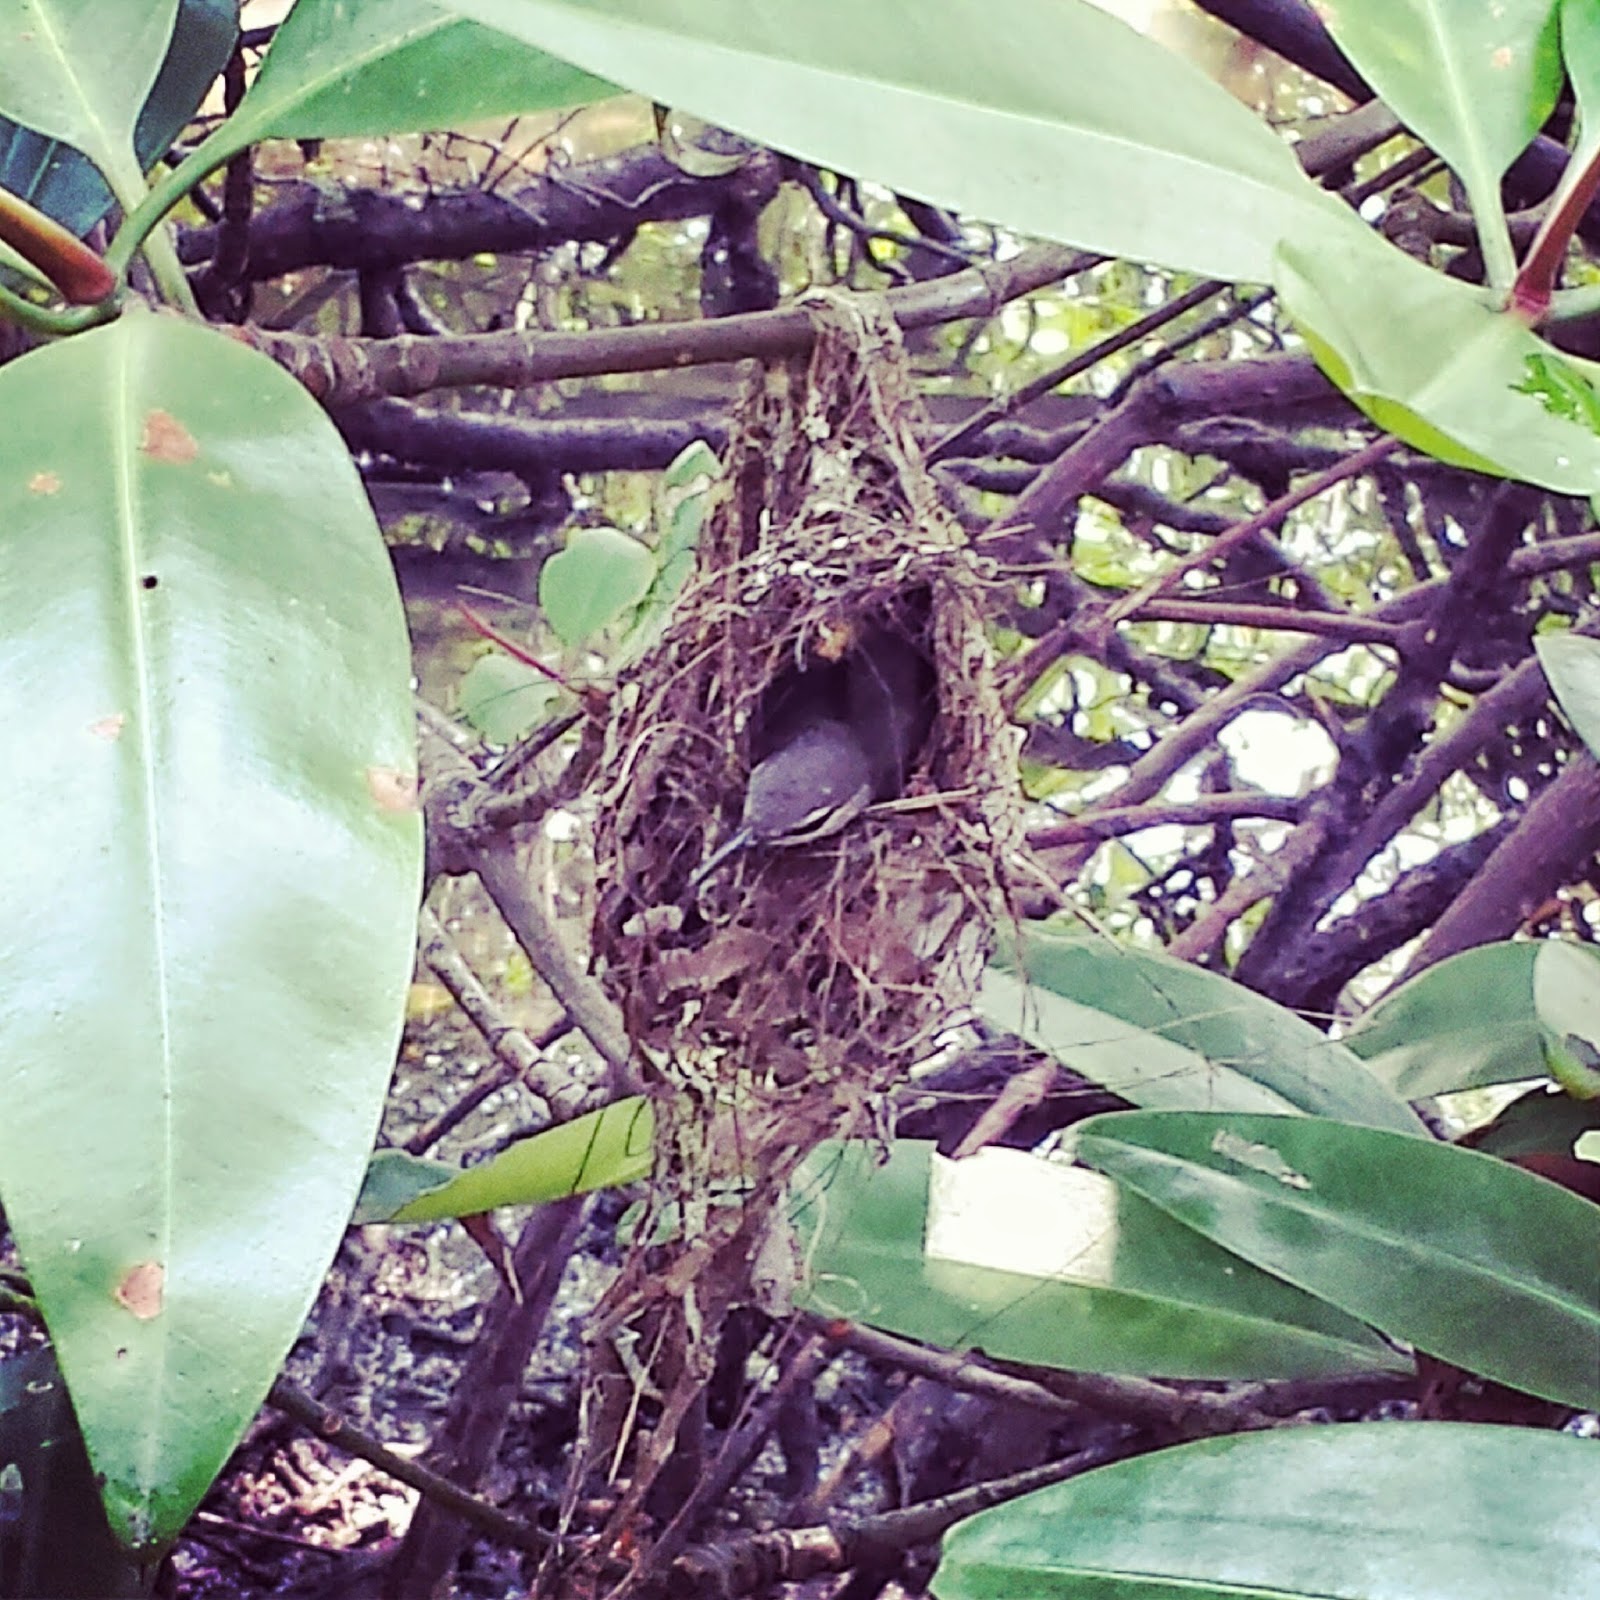
A weaver bird arranges the twigs that form its home

The first guided tour was to set off at 0930, which was far too early for my friends and I.  As with most of our peers, we love Saturdays with late starts, as a panacea to all those early days we have during the week.  Thankfully, the kind people at Sungei Buloh pre-empted this and had later tours, at 1100 and 1300 respectively.  The 1100 tour was more of our kind of timing, though I was a little sad at the thought that we’d miss the plant-a-propagule segment.


Wait, plant-a-what?  A propagule is a propagated mangrove sapling.  To the unscientific eye, they look very much like long beans haha.  These saplings fall to the mudflat, to allow the tree to propagate itself.  The waves might then carry it away so the new plant doesn’t crowd out its parent.  In Sungei Buloh, to ensure an even spread of plants, park rangers collect fallen propagules, allow them to grow stronger in a nursery and only then replant them in the mangrove in selected spots.
As luck would have it, when we arrived, there were still propagules!  All we had to do was to fill up some little bags with earth and pop a propagule in them, for them to be sent to the nursery.  Volunteers are also welcome for the eventual transplanting to the mudflats, which will give you more of the “real deal” feeling of planting, though this may be for the gutsier types, as our guide told us that you will need a sturdy pair of boots for this.  The mud flats are squishy and will swallow up boots which are not tightly affixed to your foot (of course you can still use your hands to dig the boot out).  
After the planting, we were ready to go on the guided tour, starting at the boardwalk.  My friends and I suffer from this peculiar “check-listing” disease.  Symptoms include: irrational devising of checklists in all situations; anxiety/ feelings of being kan cheong when an item cannot be checked-off; and charging ahead when an item appears.  Our checklist for the day was: crocodiles, horseshoe crabs, smooth otters, and snakes.  How could we think we could compel nature to produce these for our viewing pleasure? (See “irrational”, above.)
The first thing we saw, when our eyes adjusted to the green, was mosquitoes.  Swarms of mosquitoes.  Top tip: bring repellent. Lots of repellent.  Or, you can bring a friend who can be the sacrificial lamb for the group by being the only person who gets bitten (there is usually one person in every group, and v sadly, when I am around, this person is me).  I wore neutral-coloured clothes, sprayed repellent liberally, and wore a mosquito patch, but nothing worked.  Despite the pests, it was still fun and I’d definitely go again, which I think is a pretty good testimony haha.  
Back to the tour.  My aural memory (is this even a term?) is pretty good, so I can remember maybe a good 80% of the guided tour, but I don’t want to give too many spoilers here, so I will only write down what I considered personally to be highlights.
Sungei Buloh, when translated literally from Malay into English, is River (Sungei) Bamboo (Buloh).  Bamboo, however, are not native to Singapore.  Nonetheless, as you walk along the boardwalk, you’ll see two groups of bamboo, one at the start and one at the end.  The one at the start is dark in colour, almost black, thin and shaped like a fan.  I initially thought it looked pretty oppressive, till I saw the squirrels playing and jumping from its branches.  Turns out that squirrels love that bamboo.  The one at the end is what we’re more used to seeing, green straight stalks. 
I really liked the sea holly, so named for its resemblance to the holly that we associate with Christmas.  Sea holly has spiky outer leaves, an adaptation designed to prevent its round inner leaves from being eaten.  The plant is really quite pretty, sadly it is listed as ‘vulnerable’ on the Red List of threatened plants in Singapore (for more information on this plant, see this website – their AMAZING blog and is my guide to all nature happenings in Singapore). 


One thing that struck me was how many plants we saw have common names which are derived from land plants e.g. sea hibiscus (so named for the similarity of its flowers), and sea almond (for similarity of the taste of its seeds!).   I guess humans have a tendency to associate the unfamiliar with the familiar, and it’s always a really nice feeling, especially when you’re overseas, to see something new and different which is somehow familiar to something you know from home.  
We saw plenty of little tree-climbing/ vinegar crabs as well.  Tree-climbing, because the crabs use their sharp legs to scale trees when the tide rises, probably to avoid the predators in the water.  Sadly for the crabs, once they are out of the water, they are exposed from the air, and become tasty snacks for the birds.  These crabs were also once tasty dishes popular with humans.  Our guide's grandfather told her that he used to pickle this crab in black sauce with vinegar, and take it with porridge (hence the name vinegar crab).  He might have been Teochew, as this practice was popular with the Teochews, see here for more info.   

The vinegar crab is pictured with edible snails known locally as gong-gong (dog conch).
As a Singaporean, food is never too far from my thoughts.

Another common creature that is relatively easy to spot (when its basking in the sun) is the mudskipper.  As a life-long city dweller, my eyes have become unaccustomed to spotting wildlife, I think I used to be better at this when I was a child!  The little boy who was in our tour group was excellent at spotting wildlife, and at his call, my friends and I would eagerly respond with 'Where? Where?'  Which eventually became 'WHERE??' when we realised how rubbish our eyes were haha.  But with patience and stillness, see the animals you will.  Pictured below is the giant mudskipper, which I used to think was very cute until I saw this.  Looks like my city eyes gave me false impressions.  The giant mudskipper, unlike the yellow-spotted mudskipper, has two black stripes, one down its left and one down its right.  It is also, well, giant, or at least larger than the other type.  On land, the mudskippers look quite chubby-cheeked, as they store water in pouches to allow them to take in the dissolved oxygen.  Fascinatingly, their eyes can roll 360 degrees to access this oxygen! 


One thing that was alarmingly easy to spot was litter.  This was quite disheartening - who litters in a nature reserve?

Not all the litter was as picturesque as this football, there was the usual
plastic bag/ bottle type of litter.

A difficult spot (not by me, obvs) was a weaver bird's nest.  This is the great benefit of going in a group: more eyes, all the better to see nature with!  This nest was under a tree, and we initially thought it was uninhabited.  Nature however, requires some patience, and after a while, the little weaver bird flew home!  It carried some twigs in its beak, and proceeded to spruce up its nest, before cosying in till its next flight out.

Busy at work.

Taking a short breather to cosy up in its nest. In less than a minute, it was off again!


I was pretty amazed by another tour guide who spotted a snake.  In the picture below, the red of the snake can be seen, but the tree was a slight distance away from the boardwalk, so I think she must have super eyes.  This little snake is the paradise tree snake, a gifted glider which can propel itself off trees to spring surprise attacks on its prey.  Although as thin as a whip here, it can grow up to 1 metre long, and when it does, it can go after squirrels. 


This incredible NatGeo clip, filmed in Singapore, shows the snake in flight. http://www.youtube.com/watch?v=6OVMebCUubs 


Monday 21 April 2014

Most of the photos in this post are from an album on the SUP Yoga Singapore facebook page! Thanks very much SUP Yoga Singapore! 


From SUP's facebook page

Have you heard of Stand Up Paddleboarding, or SUP for short?  I first heard of this last year or the year before last and was fairly intrigued. On the one hand, it's a water sport and I like water sports. On the other hand, I couldn't quite figure out what it's selling point was: want to paddle? Get a kayak. Want to balance on a board? Go surfing. I kind of saw SUP as the lovechild of kayaking and surfing and thought it couldn't be all that hard? In a show of great over confidence,  my friends and I decided to skip a SUP lesson and go straight for SUP yoga! We all love yoga (and do it around thrice a week) and SUP yoga would be just another way of doing yoga right?  Plus we'd all seen @stoked_yogi on instagram and she makes everything look so effortless, maybe we'd be effortless too? Ehhhh, not quite. Hahaha. Turns out that SUP requires a lot of core, and I can't quite do a sit-up properly, so go figure! 

The incredible Stoked Yogi

It didn't help that we were all pretty nervous before the class haha. As prep,we watched videos such as this, on how to get back on your board and the realisation hit: might not be so easy to stand after all. And, horrors, we wouldn't just be standing,  we'd be doing an array of yoga poses! Also, I hadn't realised that we'd be anchored, so I had visions of myself drifting away and paddling ferociously back to the group every few minutes. My arms were tried just thinking about this. Thankfully, SUP Yoga Singapore anticipated this, and we were anchored.

From SUP's facebook page

So we headed to East Coast and surprisingly for us, arrived early. So we amused ourselves looking at the SUP-pers (hehe SUP lends itself to great puns. Like if I ever had a SUP school I'd call it YO WASSUP, with the yo standing for yoga). By amused I mean our legs quaked with fear as theirs quaked with effort. We cheered on those doing well and grimmaced when another one bit the waves. It was reassuring though, to see people do long successful runs of paddling. 

The SUP-pers at sea

So, when our turn came, our friendly instructor Nicole (who took all these wonderful pics!) gave a quick orientation: 

1. Type of boards offered: 2 types of boards, inflatable and fibreglass. If you have a premonition that your face and board may often collide, pick the inflatable. I have firsthand faceplanting experience on an inflatable board and can tell you that while it still hurts (obvs) it is not too bad. Sadly I have not had the opportunity to smash my face into a fibreglass so I can't quite compare but I think it's a fair assumption that it'll hurt more.

Anatomy of a SUP Board. Original from SUP's facebook page, edits by me. 

The inflatable paddleboards are pictured above. With some help from a nice man who was helping out at SUP, I attached my GoPro (in wrist housing) to the black strings near the nose of the Board. If you have a dry bag, you can secure it to the black lines, but chances are you won't be needing anything for the one hour at sea. 

How to fling the anchor out: space yourselves so you don't fling it onto a friend. Throw away frm the shore, towards the horizon. Try to put some muscle into the throw as otherwise,  you'll move a rope's length away from your carefully selected spot.

Trying not to look too anxious before hopping on

Paddling out: kneeling or on belly with hands (we did not have use of a paddle). If you are little, scooch more towards the ends to give yourself more room to paddle.

Row, row, row your board

If you are fairly tall, you may find the "sticky portion" a little too short for your yoga needs, but I had no problems and didn't have to adjust myself at all. Also, if you are small, your centre of gravity is lower! Yay for perks of being short! We were blessed with great weather - only gentle breezes and calm waves - so Nicole let us try the baby bakasana (crow) pose, with the option to move into a full bakasana. Full bakasana was when my face got to know the board well. Minor ow, nothing too major. 

Something to crow about (okay I'll stop with the bad puns)
From SUP's facebook page

To my surprise, the hardest pose for me (apart from the arm balances) was the humble mountain pose. It was initially a challenge to stand on the board (see lack of core mentioned above) and I fell into the water a couple times. 

The lens has gone spotty here from the water, but I'm still smiling, all is good.

The good thing is, after your first fall into the water, it is no longer scary. The downside is that in downward dog, you can welcome a nose-full of sea water. Nothing I can't handle. 

Modified warriors and mountain pose on the top left
From SUP's facebook page

The back bends were fun! Basically, anything that involves a lowered centre of gravity was fun times in my book. 

Wheels at sea - from SUP's facebook page

Being at sea practically calls out for the mermaid pose. Top tip: for this pose and the three-legged dog, really square your hips, this will prevent you from putting too much weight on either side which will then rock the board.  

From SUP's facebook page

To my surprise, there was one pose that was easier on the SUP than on land. This was the split. I was surprised that I could lower into a full side split (the front still eludes me!) and do a forward fold - that's me in the turquoise rash guard below. I think it was the desperation to be as close to the board as possible. 

From SUP's facebook page

What I really liked about SUP Yoga is the savasana pose. Drifting at sea is super relaxing. 

Om (while thinking of the om nom noms later)

So, would I recommend SUP Yoga? YES! It is great for a try. Challenge yourself and all that. Make sure you've got a decent core (I define decent by ability to hold a plank for more than a minute). 

Would I go back? Yes, but not so soon. I find SUP Yoga not so good for building ability to do poses, which is what I want to focus on right now. But it's got a great fun factor, and I've thought of new poses to test out (side plank, anyone?) on the SUP. So I'll be back! 

---
Summary of top tips:
  • Come prepared. I suggest a rash guard for more grippage if you want to do arm balances. 
  • Come ready to take a tumble in the water - it's really okay! 
  • You should have a basic yoga practice, or at least know the names of the basic poses
  • Find out more about SUP Yoga Singapore here, or here
  • Cost: $50 for a single session ($30 for a deposit on Paypal, $20 to be paid after class)
  • When: A sunset session every Sunday at 5:30 - 6:30 pm
  • Where: Meet at the beach opposite the bus stop at F3 car park at East Coast Park
  • Washing -up facilities at the Water Venture which is around 50m away (bring towels, toiletries and a change of clothes)
  • Make a reservation here
  • Have fun! 
A happy customer after the class!

Friday 11 April 2014

Boracay, famed for it's white beaches and clear turquoise waters, certainly lives up to it's billing.


Getting there: 

Before we had the relaxing waves of Boracay roll over us, we had plans to get there in Amazing Race style and enjoy a triumph over the scores of other travellers (pointless competition, check). Your route will be as follows: airport --> tricycle to ferry pier --> ferry ---> tricycle (to your resort in Boracay). 

Top tip: after landing at Caticlan, you will need to register, and you can purchase all the tickets you need at the registration counter on the right-most side. The tickets required are the following: (i) tricycle to the ferry pier and ferry pier ticket: 75 php for both, (ii) environmental fee: 75 php, (iii) terminal fee: 100 php. Total: 250 php


When departing from Caticlan airport (even on domestic flights), you will need to pay 200 php per person in cash, so make sure to set this amount aside. 

Where to stay: 

The island map is roughly like this:


Most people stay at Station 1, 2 or 3. Station 1 has the more upscale places and Station 3 is developing in the same direction. I may be a bit biased but I'm convinced that Station 2 is the life of the party in Boracay.  This website agrees.


We stayed at Frendz Resort, located between Station 1 and Station 2. This resort really ought to have the tagline "There are no strangers here, only friends you have never met." Incidentally that is the tagline in the photograph near the locker area of the gym I go to. Amusing/inspiring/slightly creepy? You decide.

Anyway, back to Frendz Resort. Great place, located only a two minute walk away from the beach. So it's not a beachfront property but still extremely close. Lodging options are hostel dorms or private rooms in cabana-style living. Simple but clean. There is an air conditioning a fan option. The former will cost you 200 php more a night.  It is super hot in Boracay so we chose air conditioning. Wi-fi is available at the common area but also in the rooms located close to that area (like ours!).

The best thing about the place is the beach chairs provided free for the use of guests at Frendz (it kills me to use this spelling so many times). They also provide beach towels. 


The view from the beach chairs - pretty sweet right. 
If you're minded to make friends or travelling alone, Frendz is great! Within seconds of having our welcome drink (just juice, nothing fancy, but a nice touch), we were chatting with a German girl who was on her third trip to Boracay and was there for two whole weeks! 

What to do:

1.       Relax on the beach.


Obvs. Sunscreen and after-sun lotion are must-haves and can be purchased at D'Mall if you run out.  


The sunset on our last day was beautiful

Which in turn allows for beautiful pictures like this


2.      Beach activities.

If, like me, you suffer from the "itchy backside" syndrome and feel a constant need to DO THINGS and SEE THINGS, after a couple hours of lazing, you'll be raring to go. Thankfully, there is plenty to do in Boracay.


(a)       Paid activities  


·        From diving to ATV tours around the island to banana boat rides, to zorbing and sunset cruises and parasailing, to dragon-boating and stand-up paddling, the range of activities is amazing. After a very short while, you'll become well-acquainted with the gamut of activities, as beach boys will keep coming up to you to push their activities. Top tip: bargain! The sunset cruise started at a price of 6,000 php (whattttt?!) and got bargained down to 300 php. Zorbing started at a price of 1,000 php and went down to 600 php.   


·        Cliff jumping at Ariel’s Point! For more on this awesome activity, see my post here.  


·        Kitesurfing. My sis and I considered this but ultimately did not try it.  We spoke to our friends from Frendz and learnt that it takes around a week’s worth of lessons to be able to stand comfortably, whereas we only had 3 days in Boracay! Guests of Frendz get a discount at Hagabat Kiteboarding.  


·        Be a mermaid! You can rent a tail  from Fisheye Divers (Station 2), take photographs to your heart’s content (700 php for half an hour) or go for swimming lessons (1,500 php for two hours)! For more info, visit the website here. I saw a group of college students don tails and proceed to, without any sense of irony, star in an MTV of the Little Mermaid's 'Part of Your World’. One of the girls proclaimed loudly, ‘dreams really do come true!’. Sadly, not for me as my sister refused to be a mermaid with me and I didn’t quite want to be Ariel by my lonesome self. For the men, you are also welcome to be mermen – I saw this dad sweetly accompanying his little girl on her mermaid swimming lessons.


·         Get a massage. Options: massage on a beach chair for 200 php or inside a beach front establishment (much nicer!) for 350 php for an hour. They are likely to give you an opening price of 400/450 php but will not go below 350 php.


·         Yoga. There is something incredibly calming for mind and body about doing yoga on the beach.  Between Station 1 and Station 2 (closer to the Station 1 side) there is a lady who offers morning yoga classes on the beach (7:30 – 8:30am) for 500 php.  She lays mats on a towel, so your session will be sand free.  Or, if you are comfortable enough in your practice, you can simply practice yoga on your own.  Top tip: bring a lightweight large scarf instead of a beach towel if you intend to practice yoga.  The scarf is less likely to trap sand.  I tried both options (towel on the left, rolled up scarf on the right) and much preferred the scarf. 


·         Shopping! We would not be Singaporean if we did not like to shop. The amusingly-named D'Mall (think 'The Mall') is located at Station 2. This features a whole string of food options (which are significantly cheaper than those on the beachfront), chic boutiques and so many tourist shops that allowed us to get our kitsch on.


 A nice little boutique


My sis and I both somehow understood mall to mean an air-conditioned tower block but D'Mall is more of a cluster of shops down a network of small streets. Still for city slickers it is fun to be close to civilisation after a day at the beach. Importantly, if you're like us and prone to running out of money, there are money changers available.

There is also E’Mall, located at Station 3. This has a Mango outlet. Personally, I found the range of clothes rather small, and the discounts not too attractive, but we still managed to snag some items. E’Mall is, in my view, not as exciting as D’Mall as the shops are mainly touristy shops instead of little boutiques.


(b)      Free activities

·       Explore the beach. There is a rocky outcrop known as Willy’s Rock which is located around Station 1. As devout Catholics, the local people built a statue of the Virgin Mary and turned the rock into a shrine. It is extremely picturesque.


·       There is also self-conducted yoga, as mentioned above, or you can join the dragon-boaters in their fairly gruelling warm-up routine. We saw a tourist join in for kicks. He looked pretty winded after a while.  Or, you can generally frolic. 


If I could jump like this boy, I would never walk. I would just jump all the time.


What to eat/drink:

We LOVED Backyard BBQ (at D'Mall) for its pulled pork so much we went there twice. While we didn't eat the prawns the table next to us ordered them and they looked uh-mazing.  


For cheap eats, you can't beat Andok's Litson. It serves up decent (though not fantastic) Filipino fare for good prices.

Top tip: while coconunts (buko) are ubiquitious in Boracay, these are ESPECIALLY yummy when in the form of Buko Shakes (comprising coconut juice, flesh and milk blended together with some sugar). The health conscious can request for less sugar. The Green Buko which serves up the yummy buko shakes can be found at the front of '888 Seafood' within D'Mall.


Sunday 6 April 2014

There is a strange exhilaration that comes with putting your life in a controlled kind of danger. Obviously I don't mean freewheeling danger; that is both insane and not very much fun. I'm looking for terrific not terrifying. 

With the good kind of danger comes that great kick of adrenaline to trigger the fight or flight instinct. When you're standing on a ledge leading out to sea, looking at your toes peeking over the board into the gulf of nothing before the inevitable crash into deep water, this fight or flight instinct translates into JUMP or run back off the board.


Then comes the internal fight to steady your pounding heart and to convince yourself to take the leap. The other guys at Ariel's Point told me not to think so much, but I disagree. The thinking, even the wavering, is the best part. It is the struggle before the leap that makes surfacing after a completed jump feel SO AMAZING. Because you did it. Because you did it even though you were afraid. And that is a microcosm of what makes living worthwhile. 


My peace sign here hides the fact that I was rather scared even though I don't usually have a fear of heights. 


And.... LEVITATION. 

So, the sis and I headed to Ariel's Point,  a small island off Boracay with the requisite steep cliffs and deep waters to tempt crazies like us to go.

There are 5,10 and 15 metre boards. All guests are encouraged to test out the lower boards before going for the high one. This lets you get a feel of the water impact (spoiler alert: it kind of hurts if you don't jump right!).  Of course, crazies like us just had to go for the 15 metre board. My upbringing (or perhaps innate personality) tells me: if I can challenge myself I MUST DO IT. 


The most important part of the jump - besides having the guts to actually jump - is how to nail the landing. The best way to land is feet first - the feet are the toughest part of the body. I had all these grand ambitions of doing a karate kick jump or a dive. The latter I executed but ended up doing a partial flip and while I jumped in well (head-first) I must have over balanced as I hit the water squarely on my back and wound up gasping for air and in some degree of shock. Nothing too much to overcome, and when I hauled my sorry self back up, other concerned travellers asked me if I was okay - they heard the loud 'piak' sound as I unglamorously hit the water. So if you want to dive head first, make sure that you get a clean entry, also vertically, but with your hands.Don't let the first point of impact be your precious head!


That falling shape above is me, in what is probably the safest (i.e. least painful) way to jump, though it doesn't make for the prettiest pictures. Wrap your arms around yourself, and spring off, keeping your body vertical so you get a feet first entry. On my first attempt, I didn't sufficiently engage my core and ended up getting a butt-first entry. Very. Very. Painful. And I have the burst capillaries on my poor body to show for it. Not a good idea. 

After each jump, you have to climb up a little ladder, and a series of gentle steps to get back up. And if you're jumping from the 15 metre board, you'll have to do a little swim to get to the steps. Nothing too strenuous if you are an okay swimmer. 


The price is, like the cliffs, pretty steep: 2000 php (60 sgd) per person. But this price tag comes with free flow drinks, which include water, beer and spirits. I'm certain some people in our group made up that cost solely in alcohol! We tried to go easy on the drinks till after getting some jumps in though some people took the drinks for Dutch courage haha. It's best not to drink too much as cliff jumping is inherently dangerous. The briefing in the morning solemnly mentioned that "fatalities" were not covered. Thankfully, none of that happened that day. Not a broken anything in sight either. Bruises, though, another story. 

As a part of the package, snacks in the form of fruits and deep fried sugary sweet potatoes are provided, as well as a fantastic buffet lunch.


Us happily eating the bbq buffet lunch while our new friend reclines in a hammock after the morning's adrenaline rush. 

Following lunch, no one was mad enough to start jumping right away and the Ariel's Point folk know this, so they provide snorkelling gear and kayaks (included in the price). 


We did a couple more jumps each then called it a day. 

Leaving you with a last pic of an awesome jump! This guy still managed a vertical entry into the water after the backflips. 


----

To sum up our top tips for tourists: 
  • Check out the Ariel's Point website
  • Check if your resort can book an Ariel's Point trip for you, ours did. 
  • Total cost per pax: 2000 php. They only accept cash. 
    • If you stay at The Boracay Beach Club, it'll cost you 1700 php
  • Cancellation policy: cancellations before 0900 of the day of your trip will give you a full refund. Otherwise, there will be a levy of 500 php. 
  • The boat to Ariel's Point leaves at 1130 and returns at 1630. The boat ride takes half an hour either way, so that gives you 4 hours of activity time.
  • The Ariel's Point package includes: 
    • Lunch (barbecue buffet) 
    • Snacks (watermelon and deep fried sweet potatoes)
    • Free flow drinks (beer, cocktail mixes and water) from the time you get on the boat, to the time you disembark 
    • Snorkels (no fins) 
    • Kayaks (both single and double kayaks) 
    • CLIFF JUMPING (of course!)
  • Tips for jumping: 
    • Start with the lower jumps to build confidence. 
    • Just walk up, take a breath and go! Lingering on the ledge or looking down will cause a loss of confidence. 
    • Go in feet first. The easiest way to do this is the wrap your hands around your body, or to raise your hands straight up. Tighten your core and keep steady. 
    • HAVE FUN!

 
© 2012. Design by Main-Blogger - Blogger Template and Blogging Stuff